Shot Spinner - Kerry Ryan
Problem:
I wanted a way to entertain guests at parties and other social gatherings. What better way to impress your friends than with science AND beer!
Intended Solution:
My plan was to design an automatic beer-dispensing device. A step motor controlled platform that will rotate beer glasses underneath a spigot to be filled. Hall effect sensors will be used to identify when a glass is in position to be filled. The glasses will be filled from a large pitcher located in the center of the device.
Device Requirements:
- Rotating table to put cup/container under spout
- Sensor to identify when cup/container is present
- Valve to control flow of liquid into container
Design Process: A lesson in resourcefulness, repurposing, and resilience
To start the design process I began by developing a state diagram to layout how I intend my device to work and to make sure that it would meet all of the requirements. Shown on the next page is my original state diagram.
State Diagram:
Part 1: Rotating Platform
I started off my project by trying to get the platform rotating. The idea was to use a stepper motor and a series of 3D printed gears to spin the platform. However, I had difficultly finding a lazy Susan that was appropriate for this project. Most of the ones I found online were made of glass and too heavy and/or large for this project. I found a smaller plastic one online. When the lazy Susan arrived I noticed that it was difficult to turn and did not roll smoothly on its bearings. The specifications of the item did not list how high off the surface the platform would be. These two factors made it difficult to set up the rotating platform the way I had planned.
Instead, I decided to try and mount the platform on top of the motor. The motor has a circular end which made it difficult to secure beneath the platform. Using a series of wooden rods and zip ties I was able to secure the platform on top of the motor. Some plumbers putty was used for additional stability.
Part 2: Operating the Motor
The next step was to set up the electronics for the motor. I used a 4 wire bipolar motor and easy driver from Sparkfund. Shown below is a hookup schematic from the Sparkfund website.
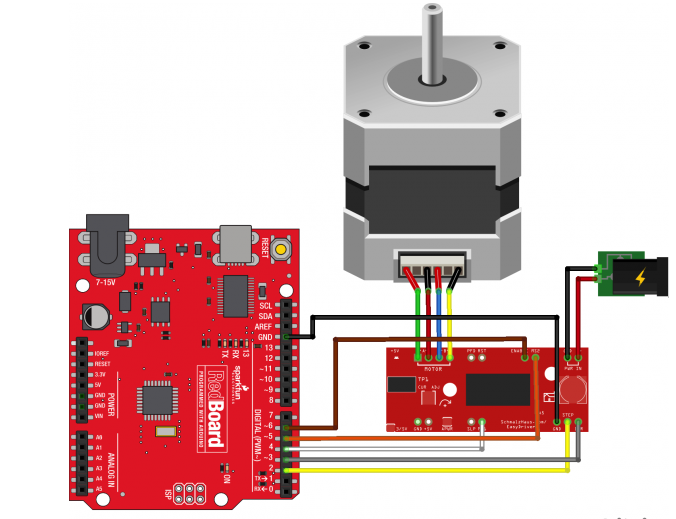
Figure 1: Schematic of stepper motor hookup. Details can be found on the Sparkfund website (https://learn.sparkfun.com/tutorials/easy-driver-hook-up-guide?_ga=1.133038150.938360751.1472576888).
Shown below is a picture of my actual set-up. The first time I attempted to setup the motor I was reading very low current that I believe was insufficient to power the motor. The setup required 6 solder connections and I believe that one of them may not have been very good. I took the setup apart and checked the connections. I re-soldered two of the connections and tried the setup again. Thankfully, this time it worked! The motor was successfully turning the platform.
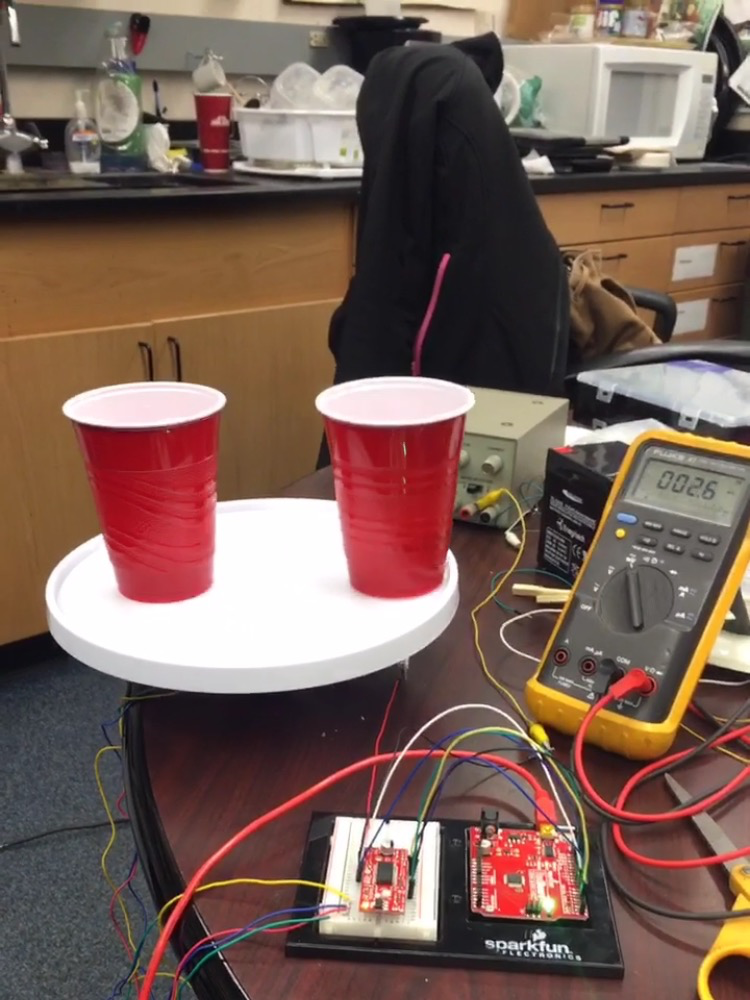
However, at this point I came across my next obstacle. The platform was not very stable because of the way the motor was attached. Given this configuration it cannot support a lot of weight, i.e. cups of beer as it rotates. To remedy this, I decided using smaller plastic cupswith \ would be more feasible. With smaller cups and less liquid, the platform would be less likely to tip to the side.
Part 3: Hall Effect Sensors
The hall effect sensor is a transducer that changes its output voltage based upon the magnetic field. Specifically, I used a Melexis US1881 sensor from Sparkfund. This sensor is a latch sensor meaning that once the sensor detects a certain magnetic field it will stay in that state until it measures a magnratic field of the opposite polarity. To implement this in our design, the idea was to put magnets of alternating polarity on the platform so that when the magnetic field changed state the device would know that a new cup was ready to be filled.
The hall effect setup is shown below:
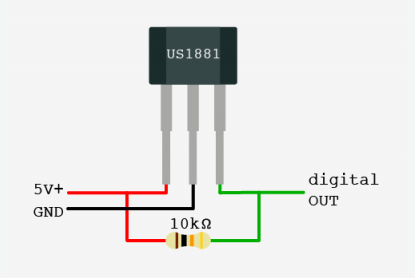
Figure 3: Hall effect sensor schematic.
http://bildr.org/2011/04/various-hall-effect-sensors/
Part 4: Dispensing Valve
To dispense the beer and/or any beverage of your choosing, I purchased a solenoid valve, food safe plastic tubing and a beer pitcher. Unfortunately, the valve I purchased was not appropriate for this project. The documentation on the website was not very clear to me and the valve required assembly parts that I did not purchase. Without this part, I had to rethink what my device could do. At this point, rather than making a beer dispenser I decided to make a shot spinner. A fun game that guests could play.
Part 5: Finalizing the shot spinner
The idea of the shot spinner is you place already filled small cups on the platform. Players sit around the platform. The game begins when you press a button located on the arduino board. The arduino randomly generates 2 numbers (which uses randomseed to start at a different place in the random number sequence each time) . The first number (0-100) determines if the platform roatates clockwise (0-50) or counterclockwise (51-100). The second number (1-2000) determines how many steps the motor takes i.e how far does it turn. When the platform stops the person with the shot drinks it. At this point you refill the cups and go again!
To make the shot spinner functional I programmed my Ardiuno as a state machine.
Initial State Check Button State Random Number Generator State Forward Rotate State or Backward Rotate State Check Button State
The process repeats this way. The default/shutdown case does not move the motor.
Future work: Along the way I encountered a number of problems that could be addressed in future modifications of this device. For one, investing in a quality rotating platform or designing a custom made platform for your purpose is important. It would be nice to have a lightweight but stable rotating platform that could support the full weight of pint glasses.
In addition, finding an appropriate valve to regulate flow would be desired. The automatic refilling could also be incorporated in to shot spinner.
In addition, this device can be repurposed for many useful tasks. Ever have trouble deciding what is for dinner? Write different ideas down and put them in the cups. Use the spinner device to pick for you! Or is there ever a certain task that needs to be done but no one is volunteering to do it? Put everyone’s name is the spinner and push the button to make the final decision!
Code - Project
// Shot Spinner by Kerry Ryan
// Segments of code modified from Sparkfund Easy Driver Hook-up Guide

 //Declare pin functions on Redboard
#define stp 2
#define dir 3
#define MS1 4
#define MS2 5
#define EN  6

//Declare variables for functions
char user_input;
int x;
int y;
int state;
int randNumdir;
int randNumturns;
const int button=12;

// Identify Different States
  const int ButtonTrigger=0;
  const int RandomNum=1;
  const int ShotSpinForward=2;
  const int ShotSpinBackward=3;

void setup() {
  pinMode(stp, OUTPUT);
  pinMode(dir, OUTPUT);
  pinMode(MS1, OUTPUT);
  pinMode(MS2, OUTPUT);
  pinMode(EN, OUTPUT);
  pinMode(button,INPUT);
  resetEDPins(); //Set step, direction, microstep and enable pins to default states
  Serial.begin(9600); //Open Serial connection for debugging
  Serial.println("Press button to begin!");
  Serial.println();
  randomSeed(analogRead(0));
  digitalWrite(EN, LOW); //Pull enable pin low to allow motor control
}

void loop() {
  // Start of in Random number generator case
   static int state = ButtonTrigger;

    switch(state) {

      case ButtonTrigger:
      //Wait for Button Trigger Case
      if (digitalRead(button)==HIGH){
        state=RandomNum;
      }
      else{
        state=ButtonTrigger;
      }
        break;

      case RandomNum:
      //Random Number Generation
      randNumdir=random(0,100);
      randNumturns=random(1,2000);
      delay(100);

      if (randNumdir>50){
        state=ShotSpinForward;
      }
      else{
        state=ShotSpinBackward;
      }

      break;

      case ShotSpinForward:
      // Platform will rotate forward randNumturns steps
      Serial.println("Shots! Shots! Shots! ");
      digitalWrite(dir, LOW); //Pull direction pin low to move "forward"
      for(x= 1; x<randNumturns; x++)  //Loop the forward stepping enough times for motion to be visible
      {
        digitalWrite(stp,HIGH); //Trigger one step forward
        delay(5);
        digitalWrite(stp,LOW); //Pull step pin low so it can be triggered again
        delay(5);
      }
      Serial.println("Refill! Then push button again!");
      state=ButtonTrigger;

        break;

      case ShotSpinBackward:
       Serial.println("Party! Party! Party!");
       digitalWrite(dir, HIGH); //Pull direction pin high to move in "reverse"
        for(x= 1; x<randNumturns; x++){  //Loop the stepping enough times for motion to be visible
          digitalWrite(stp,HIGH); //Trigger one step
          delay(5);
          digitalWrite(stp,LOW); //Pull step pin low so it can be triggered again
          delay(5);
          }
          Serial.println("Refill! Then push button again!");
          state=ButtonTrigger;


      default:
        // Shutdown Case
        while(state>3){
          resetEDPins();
        }

    }
 }
//Reset Easy Driver pins to default states
void resetEDPins()
{
  digitalWrite(stp, LOW);
  digitalWrite(dir, LOW);
  digitalWrite(MS1, LOW);
  digitalWrite(MS2, LOW);
  digitalWrite(EN, HIGH);
}
Code - Hall Sensor
 const int magstate=7;
int sensorVal;
const int light=9;

void setup() {
  // put your setup code here, to run once:
pinMode(magstate, INPUT);
Serial.begin(9600);
}

void loop() {
  // put your main code here, to run repeatedly:
sensorVal=digitalRead(magstate);
Serial.println(sensorVal);
delay(500);
  if(sensorVal==1){
   digitalWrite(light, HIGH);
   }
else{
  digitalWrite(light, LOW);
}

}